Introduction
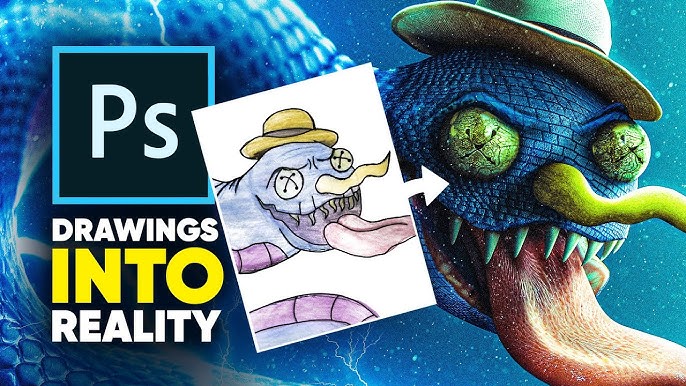
In this tutorial, we’ll pay tribute to the popular Photoshop artist Benny Productions by recreating his distinctive “realistified” style using PicsArt on mobile devices. The goal of this technique is to transform a simple drawing or sketch into a realistic image through the application of photographic textures and advanced editing techniques. This approach bridges the gap between traditional art and digital photography, creating unique hybrid artworks that have a distinctive aesthetic appeal. While we’re using a mobile app rather than Photoshop, we can achieve remarkably similar results with careful attention to detail and technique.
Step 1: The Base Drawing
Start with a solid foundation for your realistified artwork:
- Create or source a simple digital sketch or drawing – the clearer the outlines, the better the final result
- If you’re scanning a traditional drawing, ensure good lighting and high contrast for clean lines
- Import the drawing into PicsArt as your base layer
- If necessary, clean up the drawing using PicsArt’s drawing tools to enhance lines and remove smudges
- Consider the complexity of your drawing – simpler subjects often yield better results for beginners
- Ensure your drawing has clearly defined sections that will correspond to different textures (e.g., separate areas for skin, clothing, hair, etc.)
Step 2: Finding Photographic Textures
Source high-quality photographic textures that match the materials in your drawing:
- Skin Texture: Search for high-resolution facial skin texture photos with neutral expressions and even lighting
- Fabric Textures: Find photos of the specific fabric types in your drawing (cotton, silk, denim, etc.)
- Hair Textures: Look for close-up photos of hair that match the style and direction in your drawing
- Metal/Glass/Other Materials: Source appropriate texture photos for any other materials in your drawing
Where to find quality textures:
- Texture subscription services like TextureKing or cgbookcase
- Free resource sites like Texture Haven or Poly Haven
- Photography resource sites that offer free textures
- Take your own photos of textured surfaces under even lighting
When selecting textures, ensure they are:
- High resolution (at least 2000 pixels on the longest side)
- Evenly lit with minimal shadows
- Front-lit to avoid directional lighting conflicts
- Free of watermarks or other distracting elements
Step 3: Clipping and Warping in PicsArt
- For each section of the drawing (e.g., a shirt), add the corresponding texture photo using “Add Photo”
- Position the texture photo above the drawing layer in the layer stack
- Use the “Clipping Mask” feature to confine the texture to only the area of the corresponding drawing section:
- Select the texture layer
- Tap on the “Mask” option in the layer menu
- Choose “Clipping Mask” to restrict the texture to the shape below
- Use the “Cutout” tool to refine the shapes if needed:
- If sections aren’t clearly defined in your original drawing, use Cutout to create precise selections
- Create separate layers for each major section of your drawing
- Use the “Stretch” tool to warp the texture for a 3D effect:
- Select the texture layer
- Tap “Tools” > “Deform” > “Warp”
- Adjust the texture to match the contours and perspective of your drawing
- Pay special attention to areas that would naturally show form, like the curves of a face or the folds of fabric
- Apply different blend modes to integrate the textures naturally:
- Multiply for shadows and depth
- Overlay for mid-tone texture enhancement
- Soft Light for subtle texturing
- Adjust the opacity of each texture layer to achieve a realistic blend (typically between 50-80%)
Step 4: Shading and Highlights
Manually add shadows and highlights to give your object three-dimensional form:
- Create a new layer above your texture layers
- Set the layer blend mode to “Multiply” for shadows or “Screen” for highlights
- Use the “Brush” tool with a soft brush and low opacity (around 20-30%)
- Paint with black to add shadows in areas that would naturally be darker:
- Underneath objects or features
- Along the sides away from the primary light source
- In crevices and folds
- Paint with white or a light color to add highlights:
- On surfaces facing the primary light source
- On prominent features or edges
- On reflective surfaces
- Build up shadows and highlights gradually with multiple brush strokes rather than applying them heavily in one pass
- Use the smudge tool lightly to blend and soften harsh transitions
- Add a layer mask to refine where shadows and highlights appear
Conclusion
Transforming a simple drawing into a realistic image is a rewarding process that combines artistic vision with technical skill. The “realistified” technique bridges the gap between traditional art and digital photography, creating unique hybrid artworks with a distinctive aesthetic. While we’ve used PicsArt on mobile devices rather than Photoshop, we’ve achieved remarkably similar results by carefully applying textures and using advanced editing techniques. The key to success lies in using high-quality textures that match the materials in your drawing and taking time to blend them naturally through clipping masks, warping, and manual shading. This technique can be applied to a wide variety of subjects, from portraits to landscapes to fantastical creatures. As you develop your skills, you might experiment with combining multiple artistic styles or creating entirely original hybrid techniques. The process of “realistifying” a drawing not only creates compelling artwork but also deepens your understanding of how light, texture, and form work together to create realistic images. This tutorial serves as a tribute to Benny Productions’ innovative approach to digital art while demonstrating that powerful creative techniques can be adapted to different tools and platforms.