Introduction
Camera RAW presets are powerful tools that can dramatically speed up your editing workflow. These presets contain pre-configured settings for exposure, contrast, color grading, and more, allowing you to achieve professional-looking results with just one click. In this tutorial, we’ll walk you through how to install and use Camera RAW presets on both Windows and Mac systems.
Prerequisites
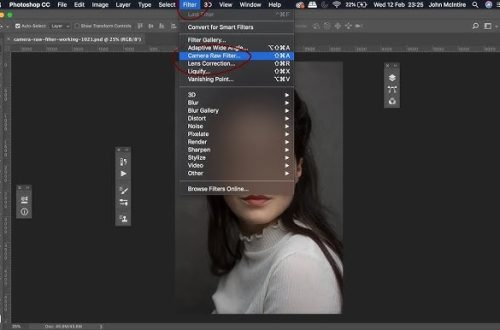
Before installing presets, ensure you have the Adobe Camera RAW (ACR) filter. Camera RAW is included with Photoshop but may need to be updated separately. To check if you have it:
- Open Photoshop
- Go to the Filter menu
- Look for “Camera Raw Filter” in the dropdown
If you don’t see it, you may need to update Photoshop or install Camera RAW separately from Adobe’s website.
Step 1: Locating the Presets Folder
Windows Users
- Close Photoshop if it’s currently open
- Press Win + R to open the Run dialog
- Type %AppData% and press Enter
- Navigate to Adobe > CameraRaw > Settings
- If the Settings folder doesn’t exist, create it
Mac Users
- Close Photoshop if it’s currently open
- Open Finder
- Press Cmd + Shift + G to open “Go to Folder”
- Type ~/Library/Application Support/Adobe/CameraRaw/Settings and press Enter
- If the Settings folder doesn’t exist, create it
Step 2: Installing the Presets
- Download your Camera RAW presets (they should be .xmp files)
- Copy these .xmp files into the Settings folder you located in Step 1
- It’s important to restart Photoshop completely after installation for the presets to appear
Step 3: Accessing and Using Your New Presets
- Open an image in Photoshop
- Go to Filter > Camera Raw Filter
- In the Camera Raw interface, click on the Presets tab (usually on the left panel)
- Your newly installed presets should now appear in the list
- Click on any preset to apply it to your image
- You can adjust the intensity using the Amount slider
Troubleshooting
If your presets don’t appear after following these steps:
- Restart Photoshop completely – This is the most common fix
- Check that you placed the .xmp files in the correct folder
- Ensure you downloaded the correct preset format (must be .xmp files for Camera RAW)
- Verify that your Photoshop version supports the presets (some presets require newer versions)
- Try clearing the Camera RAW cache (Edit > Preferences > File Handling > Camera Raw Preferences > Reset Preferences)
Conclusion
Camera RAW presets are valuable assets that can transform your editing workflow from time-consuming to efficient. With these presets, you can achieve consistent looks across your images and experiment with professional-grade color grading. For better organization, consider creating subfolders in your Settings directory to categorize your presets by style, photographer, or usage. This makes it easier to find the right preset when you need it.