Introduction
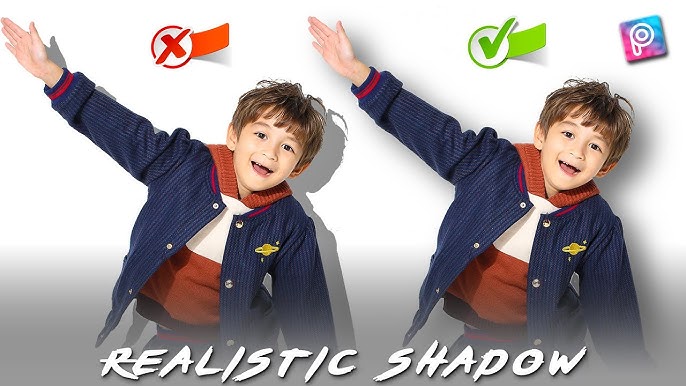
One of the most common giveaways of a fake or manipulated photo is poorly rendered shadows. The human eye is incredibly sensitive to lighting inconsistencies, and even a slightly off shadow can make a composite look amateurish. Learning to create realistic shadows in PicsArt can dramatically improve the believability of your edits. In this tutorial, we’ll explore two professional methods for adding realistic shadows in PicsArt.
Understanding Light Source
Before creating any shadow, you must first identify where the light is coming from in your background image. This is crucial because all shadows must align with this light direction to look realistic. Look for:
- Highlights on objects that indicate light direction
- Existing shadows in the scene that show the light angle
- The position of the sun or artificial light sources
Once you’ve determined the light source, all shadows you add must follow the same direction and intensity.
Method 1: The “Duplicate Layer” Trick
- Add your subject/object layer to the canvas
- Duplicate the subject layer by long-pressing and selecting “Duplicate”
- Move the duplicated layer below the original subject layer
- Lower the brightness and contrast of the bottom layer to zero to create a black silhouette (you can do this through the “Adjust” tool)
- Use the “Transform” tool (pinch and drag) to skew and distort the black layer to match the surface it would cast a shadow on
- Position the shadow where it would naturally fall based on your light source
- Lower the opacity of the shadow layer to between 20-40% for a realistic look
- Add a slight Gaussian blur to the shadow layer to soften its edges and make it look more natural
Method 2: The “Brush” Tool for Soft Shadows
- Create an empty layer below your subject by tapping the “+” icon in the layers panel
- Select the “Brush” tool from the toolbar
- Choose a soft, round brush with low opacity (around 20-30%)
- Set the brush color to black
- Carefully paint where the shadow would naturally occur, typically directly beneath the subject where it contacts the surface
- Build up the shadow gradually with multiple brush strokes rather than trying to create it with one pass
- Use the eraser tool with low opacity to blend the edges of your painted shadow
- Apply a small amount of Gaussian blur to the entire shadow layer to eliminate any harsh edges
Tips for Realism
To make your shadows look truly realistic, consider these important factors:
- Shadow Color: Shadows aren’t pure black. They often take on the color of the surface they’re cast upon. For example, shadows on grass have a greenish tint, while shadows on sand might have a yellow or orange tint. Adjust the color of your shadow layer using the “Hue” adjustment.
- Shadow Sharpness: The sharpness of a shadow depends on the light source. Hard light sources (like direct sunlight) create sharp shadows, while soft light sources (like overcast skies) create diffused shadows. Adjust your blur amount accordingly.
- Shadow Size: Objects closer to the surface they’re casting shadows on create sharper, more defined shadows. Objects farther from the surface create larger, more diffused shadows. Adjust the size of your shadow accordingly using the transform tool.
- Shadow Opacity: Shadows are rarely completely opaque. They’re usually semi-transparent, allowing some of the underlying surface to show through. Keep your shadow opacity between 20-40% for most situations.
- Perspective: Make sure your shadow follows the perspective of the scene. Shadows on flat surfaces appear as simple shapes, but shadows on curved or irregular surfaces need to match that surface’s contours.
Conclusion
Creating realistic shadows is one of the most important skills in photo editing, and mastering it in PicsArt can dramatically elevate the quality of your composites. Both methods we’ve discussed have their place: the duplicate layer method is excellent for creating sharp, defined shadows, while the brush method works best for soft, diffused shadows or shadows on irregular surfaces. The key to success is careful observation of the existing lighting in your scene and matching your shadows to that lighting. Before and after examples clearly show how proper shadow placement can transform a fake-looking composite into a believable image. Practice both techniques with different lighting scenarios to develop your eye for realistic shadows.